How to integrate Constant Contact API in WordPress in 5 simple steps?
Wondering how to implement Constant Contact API in WordPress don’t worry you are not alone. I will let you know how to connect Constant Contact API v3 to your WordPress. there are two ways you can do that in WordPress one is through the plugin and the other is using custom API
Lets first go through the simple method which is using the Constant Contact plugins(Official) and then with API
constant contact wordpress provides an official plugin which you can download by going to
Plugins -> Add New
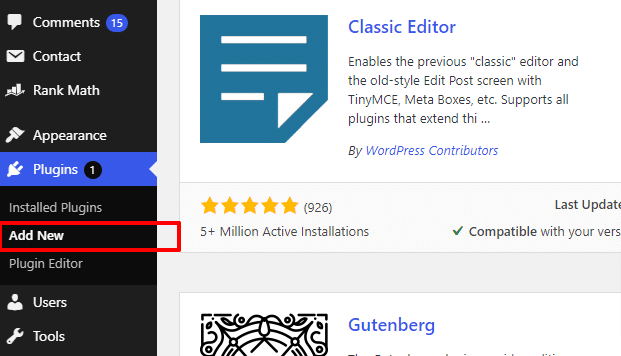
Next Search for “Constant Contact” in the search box then find and install constant contact
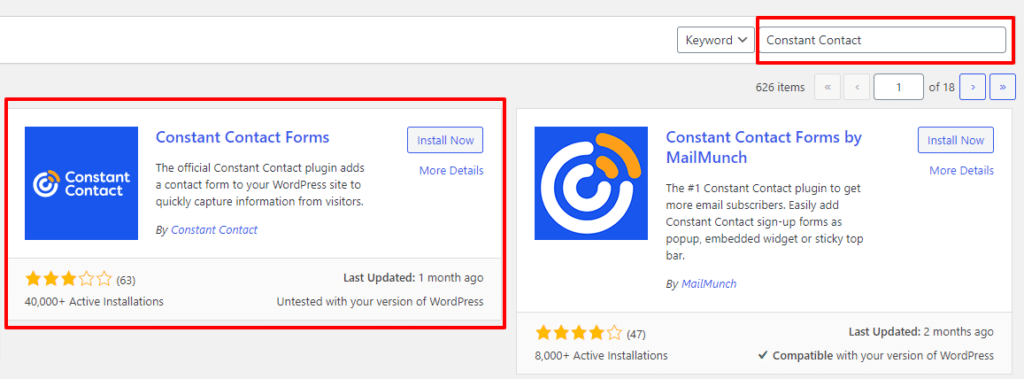
After Installing and avctivating the plugin you can sign-up or login in to your constant contact account (the verification email sometimes are delayed)
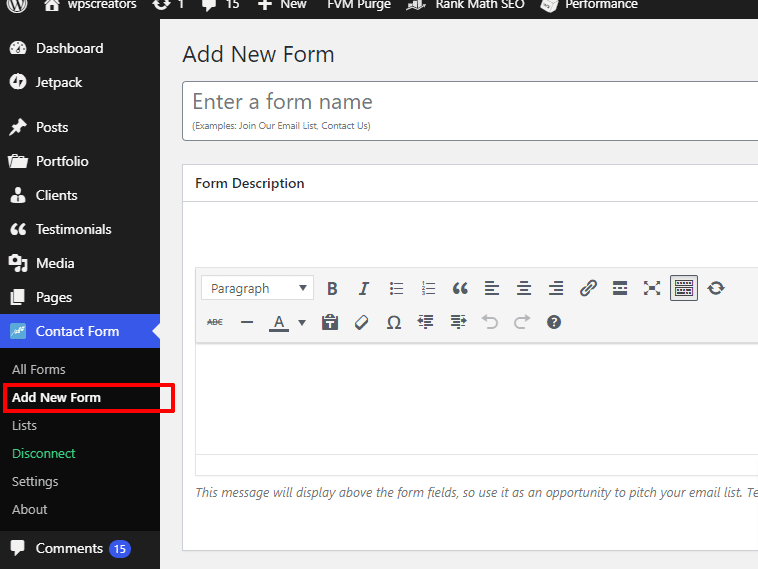
Next click on the Add New Form and fill the details as required and publish it (remember to select the list you want to add the emails in)
Once you have publish the form you will get an shortcode copy the shortcode will need it for later
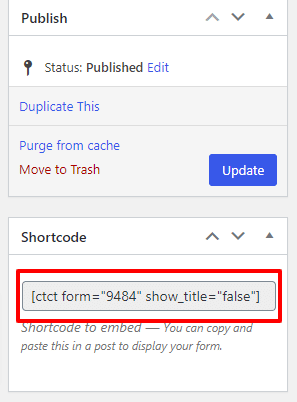
Now create a new page and add the shortcode if you are using a page builder like Elementor or Wpbakery or any other refer to its documents as each has little different steps I am using the default one for this demo
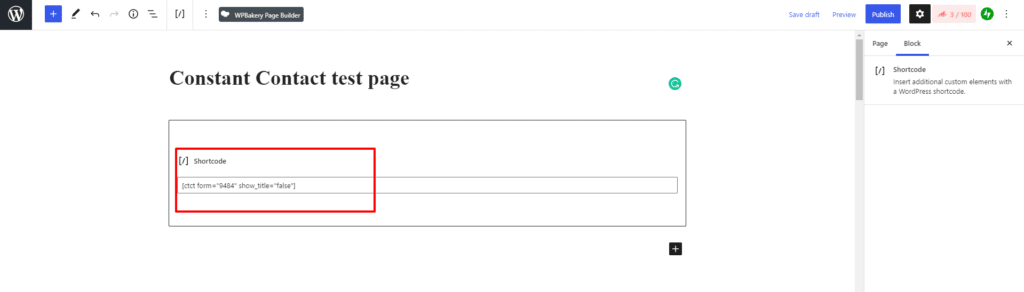
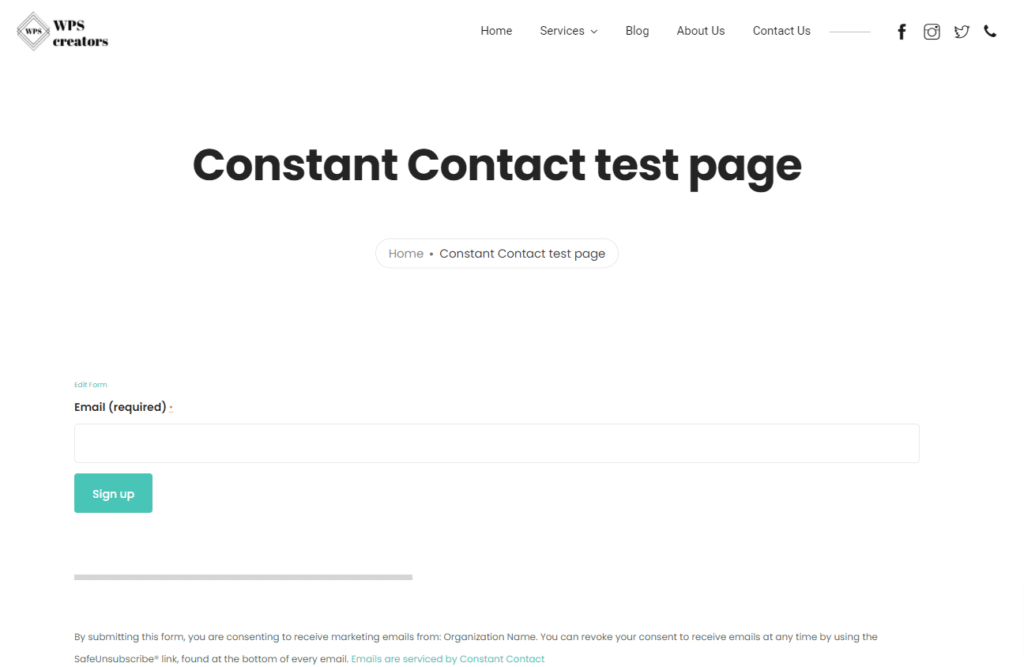
you are now all set and ready and can publish the page for the users to subscribe
Contact form 7 Constant Contact integration
Before we start with Custom Constant Contact API integration let us look at how to integrate Constant contact in CF7
First register an constant contact account if you haven’t already done that
Connecting to the API
This integration module utilizes the Constant Contact V3 API. To start using the API from your WordPress website, you first need to register an application to get an API key and an app secret that you will use later.
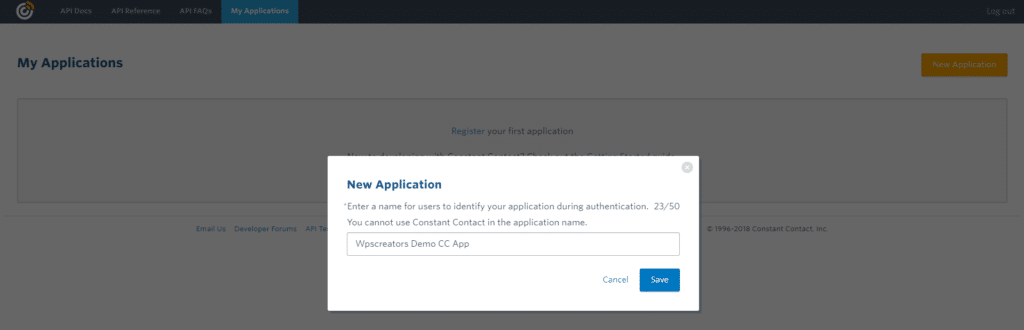
To register an application, move to the My Applications page on app.constantcontact.com and click the New Application button in the top right.
You’ll get asked for the application name. You can change the name anytime, so let’s name it “Contact Form 7 Integration
Click Save, then you’ll be directed to the Details page.
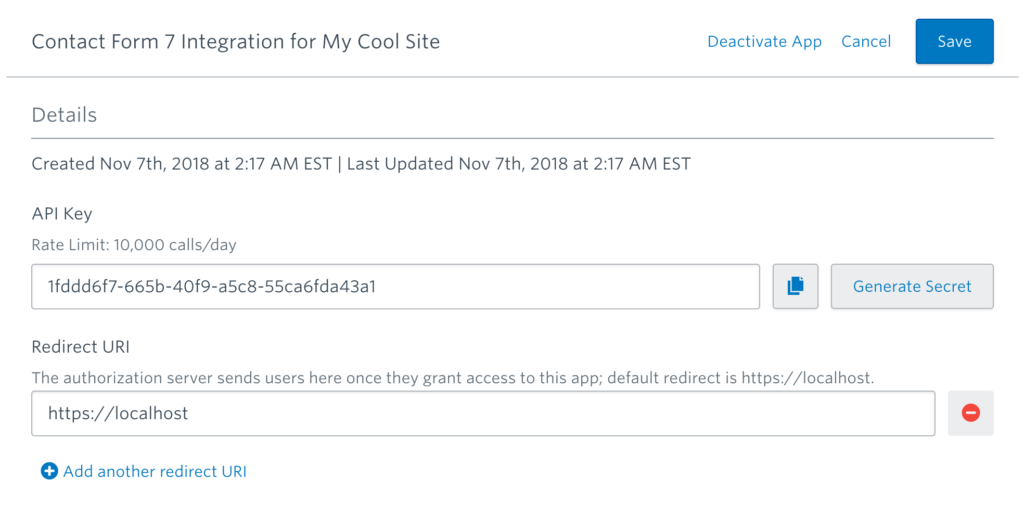
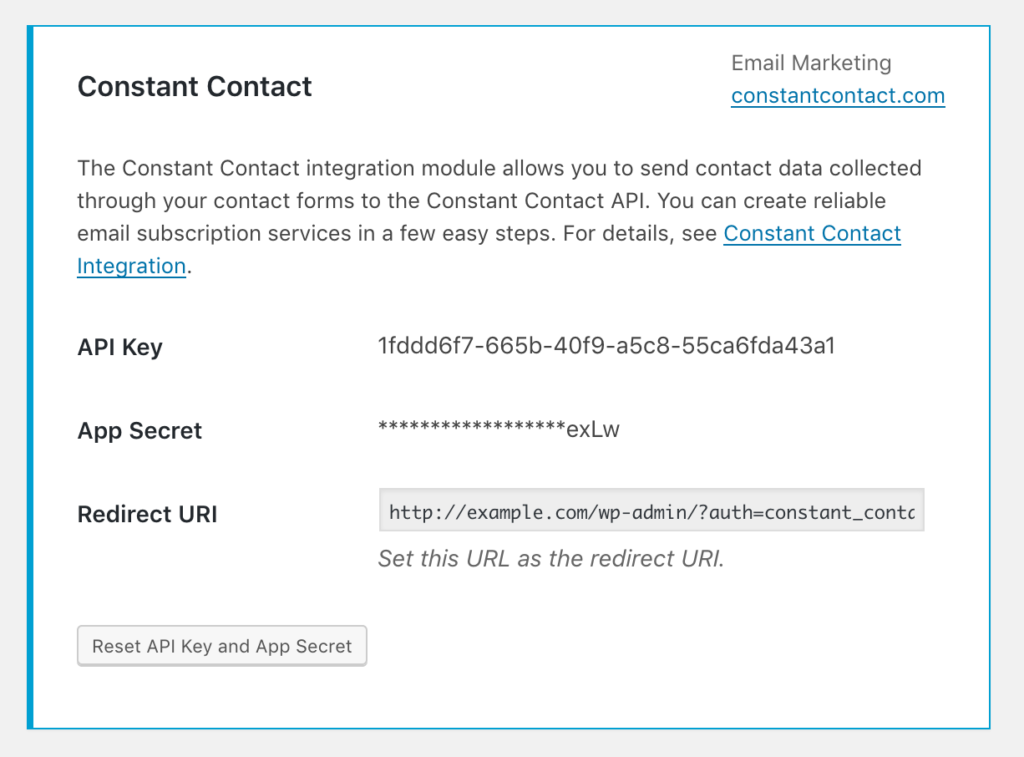
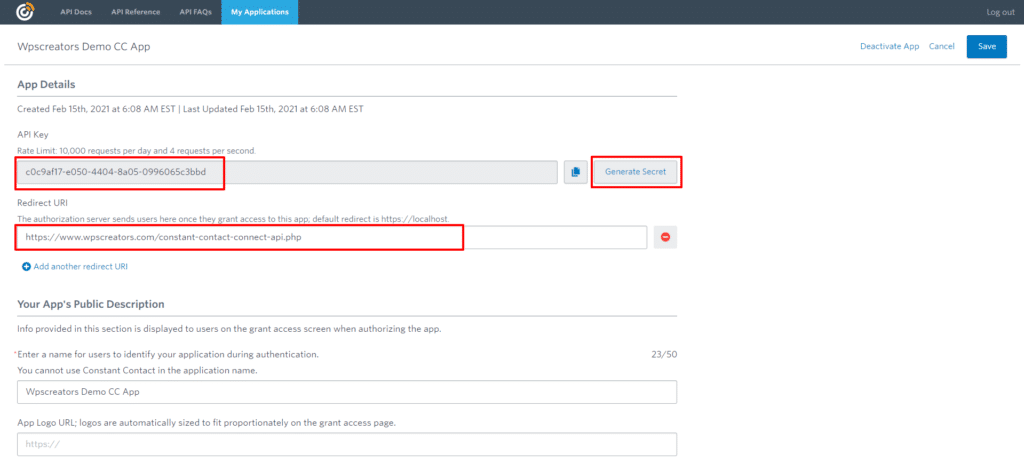
On the Details page you will find the API Key in the first field. Click the Generate Secret button next to the API Key field to generate an app secret. Copy the API key and app secret as you will use them in the next step.
Next, open the admin screen of your WordPress website in another tab of your browser. Move to the Contact > Integration menu page and find a box titled Constant Contact.
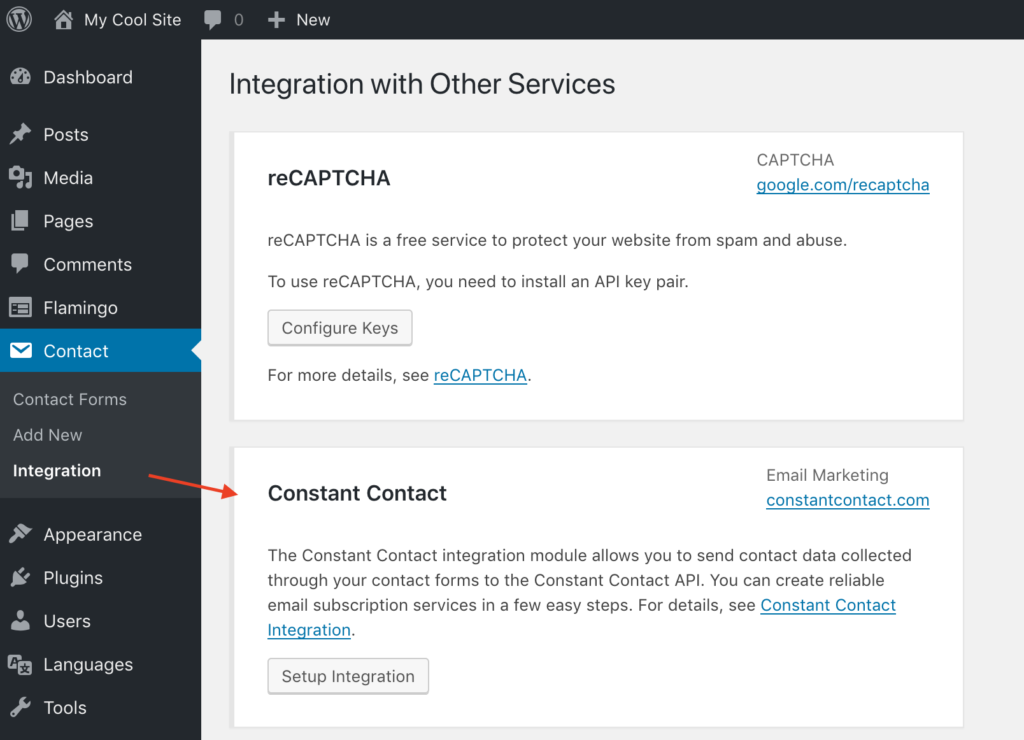
Click the Setup Integration button; it will display some input fields. Paste the strings you have copied in the previous step into the API Key and App Secret fields.
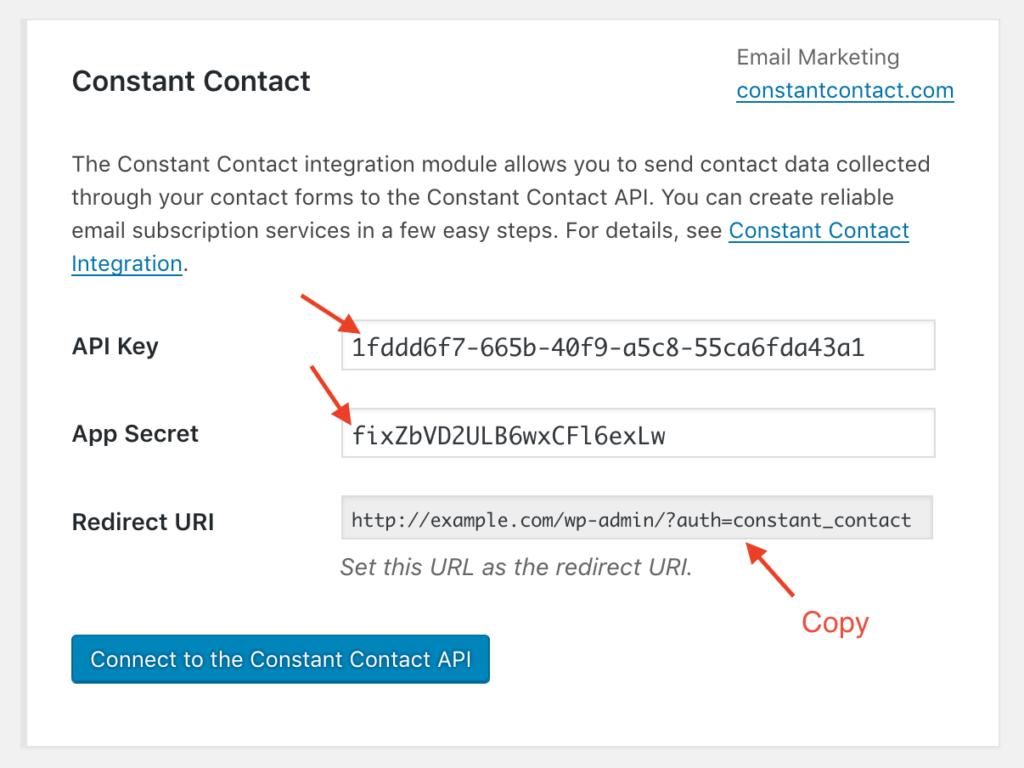
You’ll find the Redirect URI read-only field under the two fields. Copy this field value and paste it into the Redirect URI field on the Details page on app.constantcontact.com.
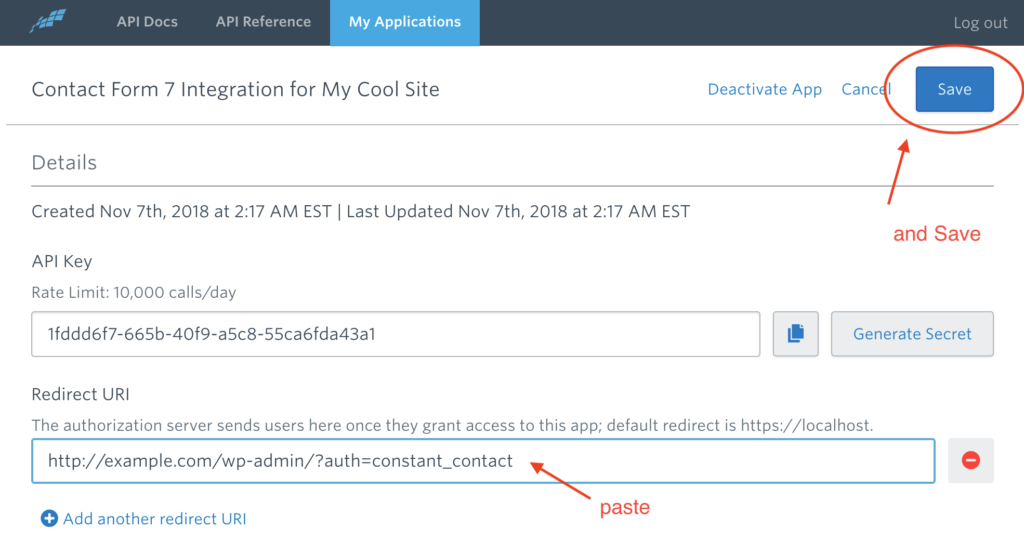
Once you change the field value on the Details page, click the Save button on the top right.
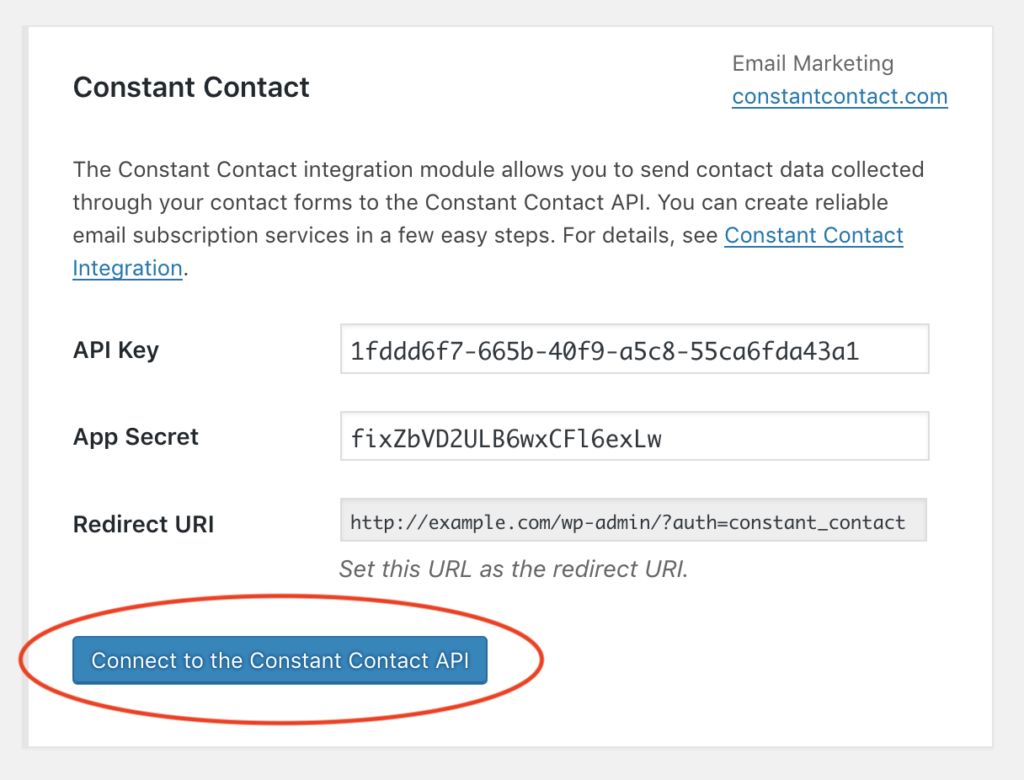
Now, you have almost completed the necessary set-ups. Move back to the Contact > Integration menu page in the WordPress admin screen and click on the Connect to the Constant Contact API button to start the authorization process.
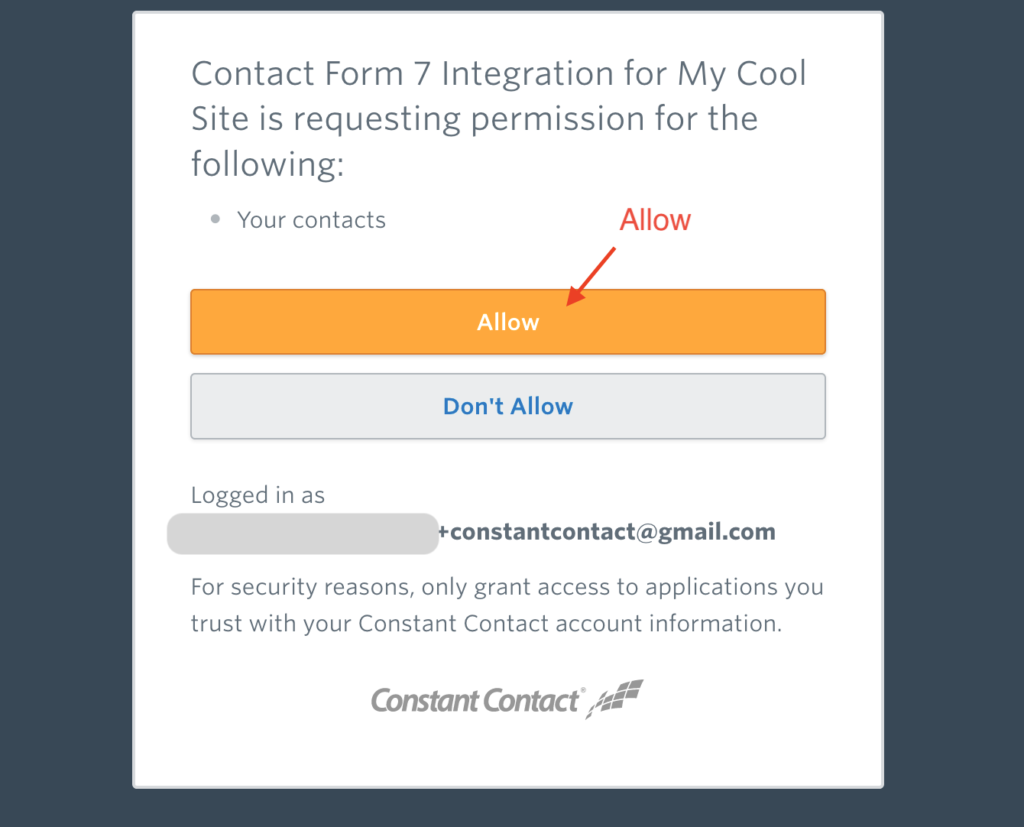
If you have set it all up correctly, you’ll get directed to the Constant Contact log-in page (if you are not logged-in yet) and will be asked to authorize the application you’ve registered to access your Constant Contact account.
After that, you will be redirected back to WordPress and find that the border color of the box has changed to blue. The blue border indicates that the connection to the API has been created successfully.
Contact properties mapping
Now, your contact forms and the Constant Contact API are connected.
Every time a valid form submission is received, Contact Form 7 will send a request to the Constant Contact API that Constant Contact add the contact data to its database based on the submission.
Constant Contact’s contact data is composed of different types of properties, such as first name, last name, email address, phone number, job title, birthday, etc. To build a request to the API, Contact Form 7 needs to know which input field of the contact form corresponds to which property of Constant Contact’s contact data.
Contact Form 7 uses the following name-based mapping table to determine the correspondence between input field and contact property. For example, if there is [email* your-email] form-tag (name: your-email) in the form, the value through the field will be used for the email_address property of a contact.
| FORM FIELD NAME | CONTACT PROPERTY |
|---|---|
your-first-name | first_name |
your-last-name | last_name |
your-name | first_name and last_name (*1) |
your-email | email_address |
your-job-title | job_title |
your-company-name | company_name |
your-birthday-month | birthday_month |
your-birthday-day | birthday_day |
your-birthday | birthday_month and birthday_day (*2) |
your-anniversary | anniversary |
your-phone-number | phone_numbers |
your-address-street | street_addresses.street |
your-address-city | street_addresses.city |
your-address-state | street_addresses.state |
your-address-postal-code | street_addresses.postal_code |
your-address-country | street_addresses.country |
*1 — If there is no your-first-name or your-last-name field in the form but there is a your-name field instead, the first word of the your-name field value will be used for the first_name contact property and the remainder will be used for the last_name property.
*2 — If there are not both the your-birthday-month and your-birthday-day fields in the form, but there is a your-birthday field with a date value in YYYY-MM-DD format, the month and day parts of the value will be used for the birthday_month and birthday_day contact properties respectively.
There may be cases where you don’t feel this mapping fits your actual form fields. For such cases, Contact Form 7 provides the wpcf7_constant_contact_contact_post_request_builder filter hook. While it requires a bit of PHP coding to make a filter function, you can customize anything and everything in a contact creating request with this filter.
Obtaining consent
It is strongly recommended that you obtain clear consent from the contact form submitter before adding their contact data to the subscription list. This is not only because collecting and using personal data without consent is illegal. It is also because delivering email to unintended receivers leads to a high spam complaint rate.
For form fields that check submitters’ consent for adding their contact data to Constant Contact subscription list, Contact Form 7 provides the consent_for:constant_contact form-tag option. You can use the option like in the following example:
[acceptance your-consent optional consent_for:constant_contact]
Add me to Constant Contact subscription list.
[/acceptance]
If you have this form-tag (acceptance checkbox) in your contact form, Contact Form 7 sends the contact data to the Constant Contact API only when the submitter has selected the checkbox to confirm their consent.
Specifying contact lists
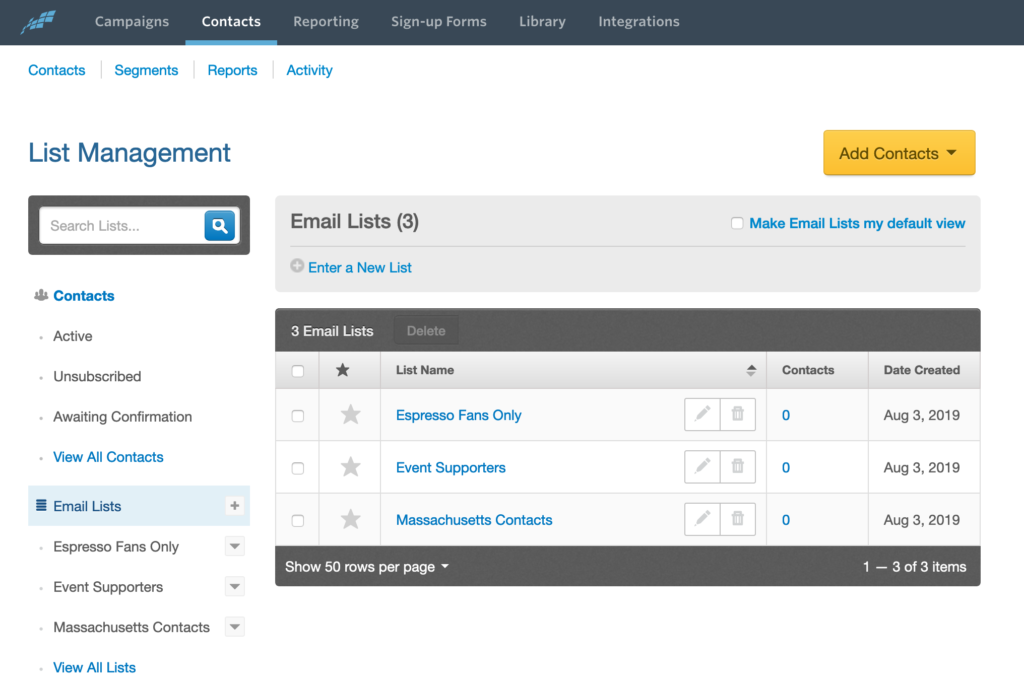
Constant Contact allows you to group contact data you have collected into contact lists (also called “email lists” or just “lists”).
Contact Form 7’s Constant Contact Integration supports specifying contact lists for new contacts collected through your contact forms.
If you have no contact lists yet, go to the Constant Contact dashboard and try creating your first list. Then, come back to the WordPress admin screen, move to the Contact > Integration menu page, and click Setup Integration to open the detailed setup page. There you will find the Contact Lists section added at the bottom of the box.
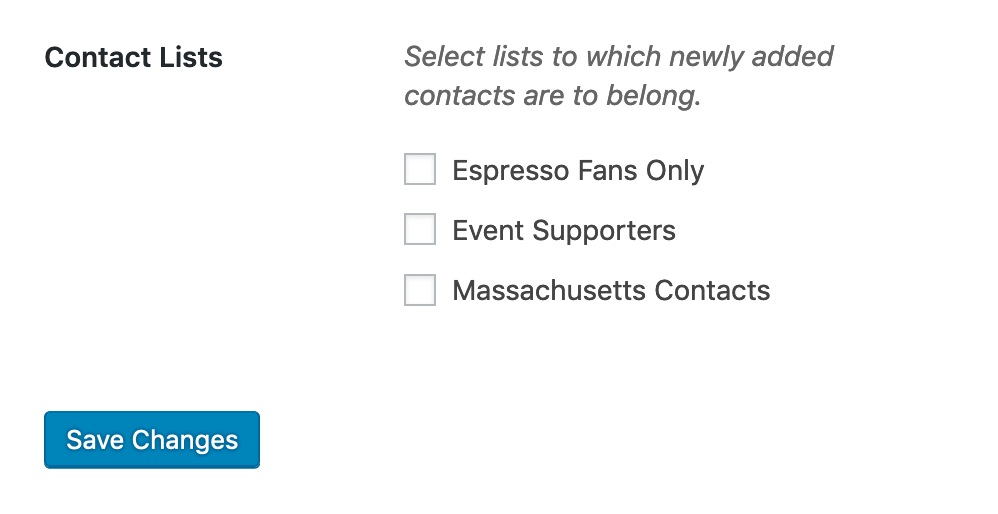
The Contact Lists section in this screen is the global setting that is applied to all contact forms on the site. If you want to specify contact lists that are applied only to a specific contact form, you can do it by adding a line to the Additional Settings tab panel of that contact form like the following:
Note This will only work or the application created before 31 march 2022
Now for what you are probably here for integrating a custom Constant Contact API in WordPress
You will need to pay close attention to details and steps i will try to keep it as simple as i can
Step 1 create an constant contact api v3 account
You first need to create constant contact API v3 account on https://v3.developer.constantcontact.com/ you can use your constant contact account which you probably already have one once you have done that login into your account you should be greeted with this screen

Step 2 Create Application/API keys for constant contact WordPress app
Now click on the New Application button and enter a name for your app and click save
Next tasks is very important copy the Constant Contact API key and save it in a safe place will need it later
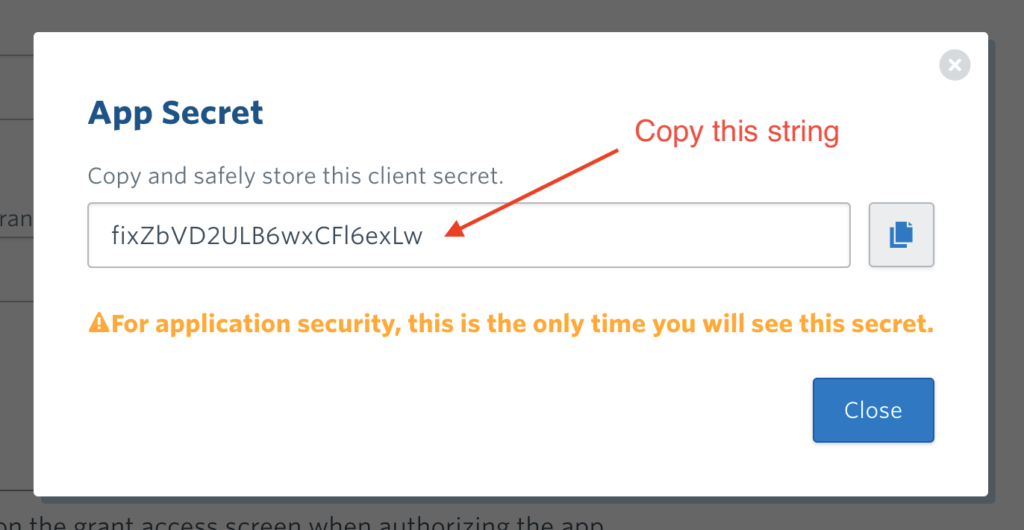
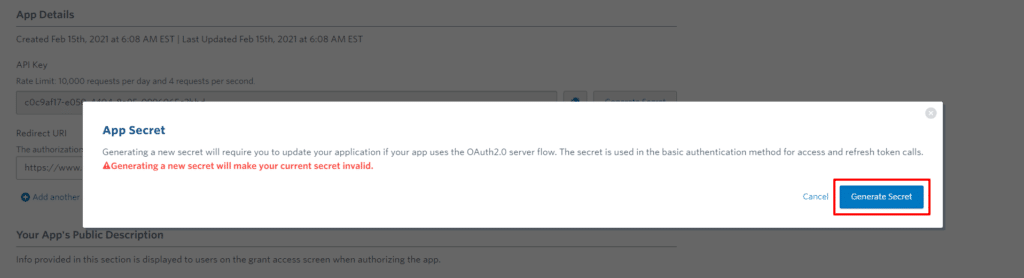
Next click on Generate Secret button this will show you a popup saying “Generating a new secret will make your current secret invalid.” click on Generate Secret button and copy the secret key and save it in a safe place as well
Now Enter the Redirect URI you need to enter it as per your domain name “https://YOURDOMAIN/constant-contact-connect-api.php” make sure you type the file name correctly
Step 3 Create a PHP file in WordPress to connect Constant Contact API in WordPress
Next is creating a PHP file in your wordpress root folder (you must be thinking thats not how you add custom php in wordpress well i know that you should build an plugin to do that i am doing it to keep it simple)
Inorder to connect and use the constant contact you need to do the following
- Generate AuthorizationURL
- Get the AccessToken
- Need a way to refresh the Token
Good News is i have already made one you can download it by clicking here
Now before you add this to your WordPress you need to make the following changes in the file
- Add the redirect URI (We had defined it in the constant contact app also double-check the file name it should be the same)
- Add the Constant Contact API v3 which we had saved earlier
- Add the Secret Key
- Define database to save the token and refresh token (will create a database in next step)
- Add DBHOST, DBUSERNAME, DBPASSWORD, and DBNAME (Read the following instruction)
LInes to edit are 3, 4, 5, 83, 87, 101, 105
DB_HOST, DB_USER, DB_PASSWORD, and DB_NAME you should have this from when you first installed WordPress if you don’t have you can check your wp-config.php in the WordPress root folder you can find them there (i would suggest you create a new database and use that instead of messing with the WordPress database)
Step 4 Create Database to save the token
Login into your database server now create a separate new database with the database name of your liking(I suggest you do not use the WordPress one as we are not following the standards)
Next create a table i have writen the query for you will have to use this for it to work
CREATE TABLE `access_token_log` (
`id` int(11) NOT NULL AUTO_INCREMENT,
`access_token` varchar(60) NOT NULL,
`refreshtoken` varchar(60) NOT NULL,
`timestamp_created` datetime NOT NULL,
PRIMARY KEY (`id`)
)
After you created the table now is a good time to see if you get the tokens
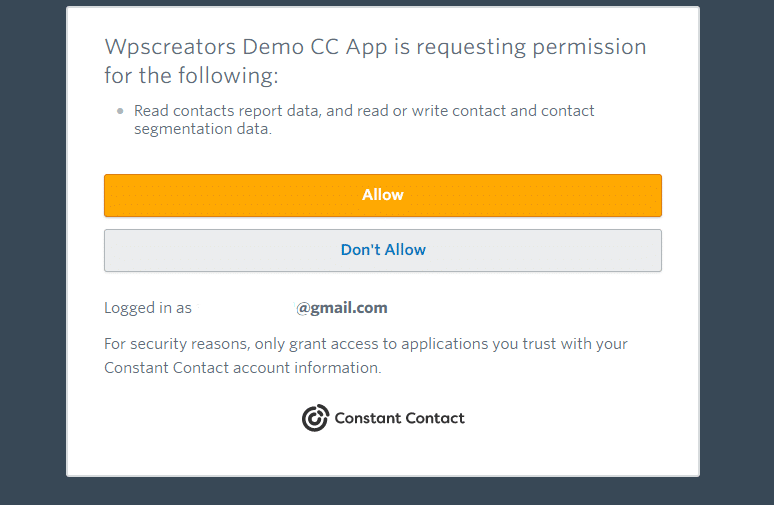
to run the app just go to https://YOURDOMAIN/constant-contact-connection-api.php you will get the authorization URL (watch out for any SQL errors) now copy the URL and open the link in a new tab now login into your constant contact to connect Constant Contact API in WordPress once you log in you should get a screen for requesting permission click to allow
If everything goes smothly you will be redirected back to the /constant-contact-redirect-api.php?code=xxxxxxx page
Now you check if the app was able to save the Token and a refresh token in the database (access_token_log) if the tokens are saved then you are almost ready before we move to the next step you need to do the following
- Comment the line number 117 (getAuthorizationURL) as we don’t want to show our keys to public
- setup a cronjob for every hour in order to refresh the token as a token is only valid for 2hrs
- 0 * * * * wget -O /dev/null https://YOURDOMAIN/constant-contact-connect-api.php this will run the file and run the app to refresh the token every hour
Step 5 writing the code to save the email id in your constant contact account using Constant Contact API in WordPress
I will give you a small demo on how you can do this but there are many different ways in which you can doit
First, we need to create a custom template page wpbeginner has a simple guide you can follow to create one.
For this demo, we would be making an ajax call to add the email id to the list using Constant Contact API in WordPress
Add the following code in you custom template page you just created and change the line number 3, 7, and 24 of the following code add yourhost db_user db_password db_name and finally the list_membership you want to add the emails in you can find your list_membership id here login into your account and then click the try button copy the list_id value add it to line number 23
Next ve build a simple html form and add some jquery to it
<?php
function constantContact($ctemail){
$conn = mysqli_connect('YOURHOST', 'DB_USER', 'DB_PASSWORD');
if (!$conn) {
die('Something went wrong while connecting to MSSQL');
} else {
mysqli_select_db($conn, 'DB_NAME');
}
if (!$conn) {
die('Could not connect: ' . mysqli_error());
}
$sql = "SELECT * FROM access_token_log ORDER BY id DESC LIMIT 1;";
$result = mysqli_query($conn ,$sql);
$result = mysqli_fetch_assoc($result);
mysqli_close($conn);
$ch = curl_init("https://api.cc.email/v3/contacts/sign_up_form");
curl_setopt( $ch, CURLOPT_HTTPHEADER, array('Content-Type:application/json','Authorization: Bearer '.$result["access_token"]));
curl_setopt($ch, CURLOPT_POST, 1);
curl_setopt($ch, CURLOPT_FRESH_CONNECT, TRUE);
curl_setopt($ch, CURLOPT_RETURNTRANSFER, true);
curl_setopt($ch, CURLOPT_POSTFIELDS,'
{
"list_memberships": ["xxxx-xxxx-xxxx-xxxx-xxxx"],
"email_address": "'.$ctemail.'",
"create_source": "Contact"
}
');
// Execute the POST request
$result = curl_exec($ch);
echo $result;
// Close cURL resource
curl_close($ch);
}
?>
<div id="idForm">
<form method="POST" action="">
<label>Enter Email ID</label>
<input type="email" style="max-width:300px;" name="emailId" required="required"  placeholder="Enter Your Email " />
<input type="submit" name="submit" >
</form>
</div>

<script>
jQuery('#idForm').submit(function (e){
e.preventDefault();
var emailid = jQuery("#idForm [name*='emailId']").val();
jQuery.post('/wp-admin/admin-ajax.php',{'action':'save_cc','submitEmail': emailid });
});
</script>
Now add the following code in your function.php file and edit the line number 6
add_action('wp_ajax_save_cc','get_cc_response');
add_action('wp_ajax_nopriv_save_cc','get_cc_response');
function get_cc_response(){
add_action('init', 'start_session', 1);
$dir = get_template_directory();
require_once($dir . '/YOUR CUSTOM TEMPLATE NAME.php');
$recivedemailid = $_POST['submitEmail'];
$ajaxresponse = constantContact($recivedemailid);
wp_die();
}
That’s it now just run the file enter an email id and click submit (and pray) the email id should now be saved to your Constant Contact list
Important Note:- The purpose of this guide is to get you started with constant contact api v3 and in no way you should use this method in a production application as we haven’t followed the WordPress standards if you have any queries do ask them in the comment section below or if you would like to get our services for the same contact us using any form on our website


